Substituting the LocalStorage system with the AsyncStorage system is beneficial in terms of securing data and storing it asynchronously. The operations supported by the AsyncStorage system work well even if the app is not connected to the internet. In this blog, we will learn about the utility of AsyncStorage in storing users’ login credentials.
Define the Async storage system
AsyncStorage is referred to as the asynchronous key-value system useful for storing data related to user preferences. This plays the part of a local storage system, which is unencrypted. The data stored can be globally accessed across the app. Hence, it is more like a data management or storage system.
Now, let's begin the steps.
Setting up the environment for the RN framework
Before starting the actual project, you have to prepare your system. It's about installing certain software like Node, JDK, Android Studio, VS Code editor, and React Native CLI. There is other software with which you can work but as I have selected the React Native CLI tools for the current project, I particularly need this software. You can reach out to experts in the React Native app development company to learn about other tools.
On the other hand, if you prefer to consider the Expo tool, you may need the Expo Go app. The choice of software will vary depending on the developer’s preferences and project requirements.
For further detail, consider the linked article. Visit the React Native CLI section in the article.
Creating a template folder
It requires a simple step. Open any folder you like and then run the cmd from the folder. As the terminal opens up in your system, run npx react-native init AsyncStorage --version 0.71.2. You can change the name of your project if you like. Here, it is the ‘AsyncStorage’. Also, note that we are considering the 0.71.2 version of React Native. So make sure to check the React Native version you are working with.
Third-party installation
Install two libraries. As we are working with an RN version >0.60, we don't have to make efforts for the library linking process. It will be automatically linked. You just need to run certain command lines on the terminal.
You need axios and @react-native-async-storage/async-storage library. Both the library provides API support to fetch data from a defined web server.
To install Axios, you have to pass npm i axios on a terminal and to install @react-native-async-storage/async-storage, run the command line npm i @react-native-async-storage/async-storage on the same terminal.
You will learn about its utility later in this tutorial blog.
Creating a login-based app using React Native AsyncStorage
You will code for three .js files. Let’s see what those are.
Logout.js file
Create a file named ‘Logout.js’ file. Start with importing the components.
Image 1
The code imports StyleSheet, TouchableOpacity, View, Text, and Button components from the react-native library. It also imports AsyncStorage from the third-party library @react-native-async-storage/async-storage.
Image 2
It specifies the main component Logout under which a function named logout is used. It further uses the AsyncStorage component to remove an item ‘token’. On the removal of the token, the code uses the navigation prop for navigating to the ‘Login’ site.
Image 3
It then renders a View tag under which a touchable opacity component and a text component are added. onPress event handler is used to make the logout button clickable and calls back the logout function.
The text on the button is set as ‘LogOut’. There are some styling elements added to the button and the text.
Image 4Here are the styling objects used for the button and the text elements. The first one is logout_box and the other one is logout_text.
Login.js file
This is the Login file where AsyncStorage is used to store data related to the user's login.
Image 5
Get started with the React Native components. The code imports Axios and AsyncStorage for making POST requests and storing data locally.
Image 6
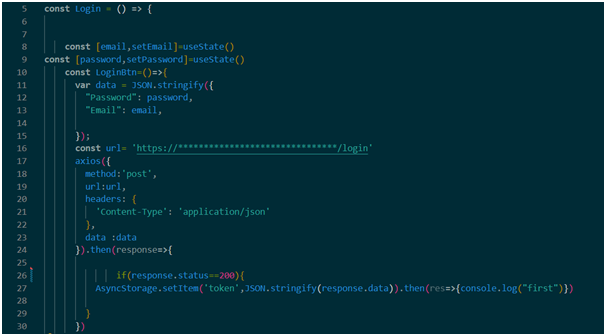
The code specifies the main Login component. Later, it uses the useState hook to set the initial state of the two-state variables namely ‘password’ and ‘email’. As the user adds their mail id and password, setEmail, and setPassword will update the change in their two respective variables.
LoginBtn is a function that considers two parameters namely email and password. JSON string is created based on these two parameters. This string is used to send a user's login data to a web server.
The code makes an API call using the Axios method. It sends the POST request with the provided data. Later the response data is stored in the AsyncStorage.
Image 7
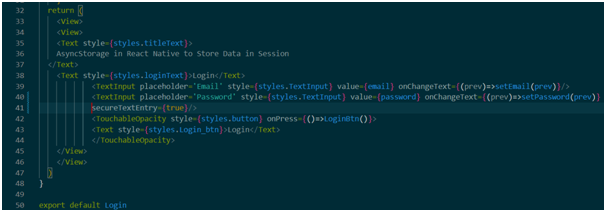
In this code snippet shown in image 7, it returns View and Text elements. TouchableOpacity and TextInput components are used to make the Login button clickable and add the placeholder element respectively.
Styling objects are added to the text, view, button, and placeholder elements.
Image 8
The snippet in image 8 shows the properties used for the styling objects. The objects are ‘loginText’, ‘TextInput’, ‘button’, ‘Login_btn’, and ‘titleText’.
So, we have completed creating the Login.js file. Let’s move forward to the last file.
App.js file
Image 9
Here, in this file, we need StyleSheet, Text, TextInput, TouchableOpacity, View, createContext, useState, useEffect, Logout, axios, AsyncStorage, and Login.
After importing the component, the code specifies a context object with the createContext() method. The context object is exported as ConetxtApi. contextApi is the constant. It is a better way to manage state variables without passing props to each level of the chain.
Image 10
useState hook is used to update changes in the state of the variable ‘data’.
In this code, the useEffect hook is used to get the token from AsyncStorage. The empty array at the end of the useEffect hook indicates that the effect should only run once when the component is first rendered.
Image 11
The Context API of React Native is used in the code to build the ContextApi provider. There are two values added in the provider namely data and SetData.
The View component is used to check whether the ‘data’ is null or not. If it is empty or null, it will return the Login component.
Image 12This part of the code shows the used styling object ‘titleText’. It has a font size of 22 pixels, fontWeight of bold, textAlign at the center, and vertical padding of 20 pixels.
As we have completed creating all the files. It's time to check the entire process.
To run the codebase on the emulator
Consider the template folder. Run cmd from this template folder and pass npm install. Then pass npx react-native run-android. Both these commands will enable the emulator.
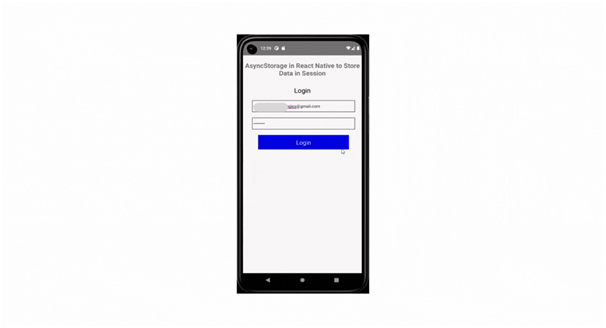
Refer to image 13 for the output.
Image 13
As you can see from the output, users can add their credentials and log in to the app. Although this is just a simple login app, you can customize the app and add other elements to it.


